
一、项目简介
这是一个商城项目,模仿淘宝京东
二、分布式基础概念
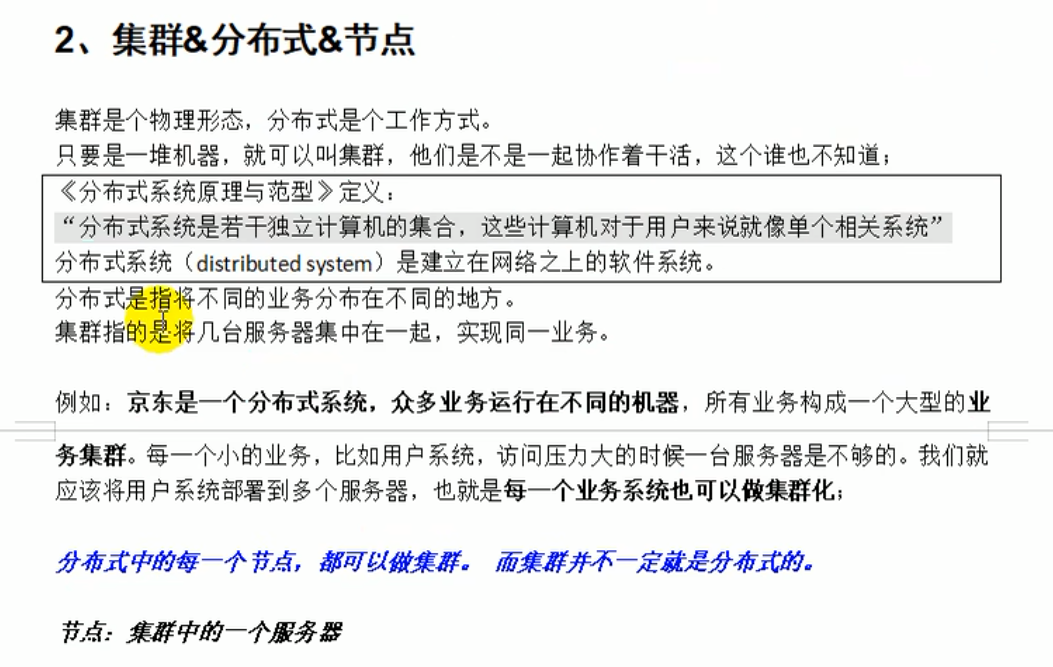
集群是个物理形态,分布式是个工作方式。
远程调用:在分布式系统中,各个服务可能处于不同主机,但是服务之间不可避免的相互调用,我们成为远程调用
springcloud中使用HTTP+JSON的方式完成远程调用
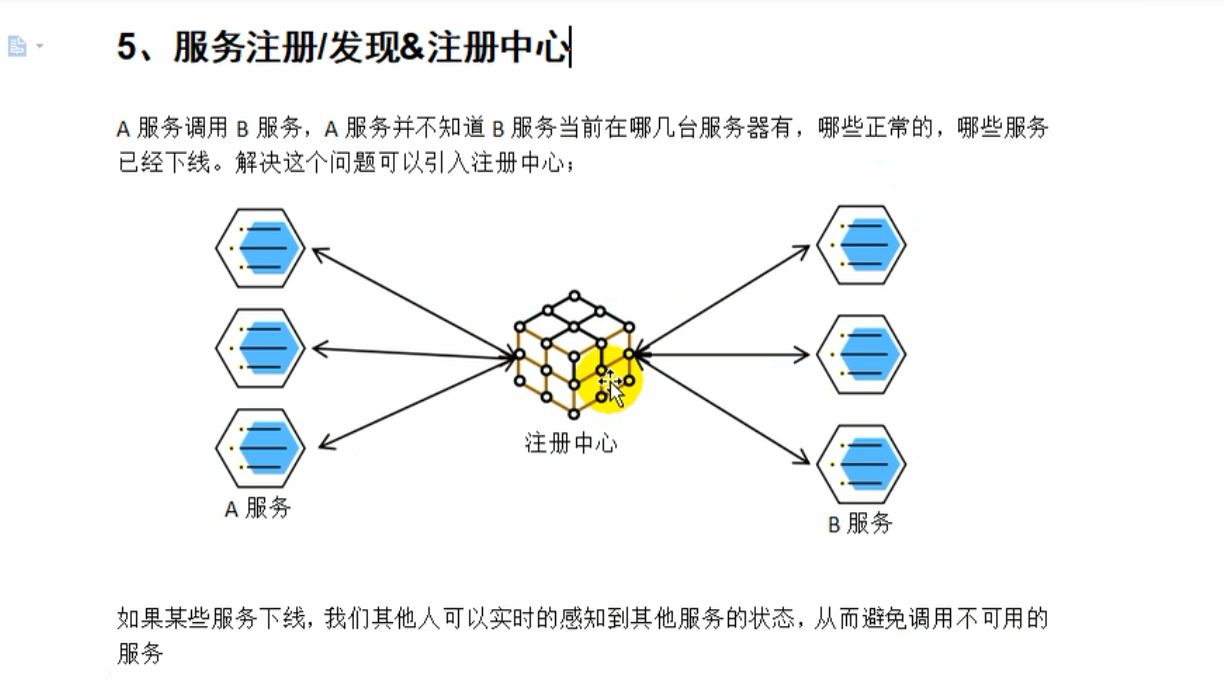
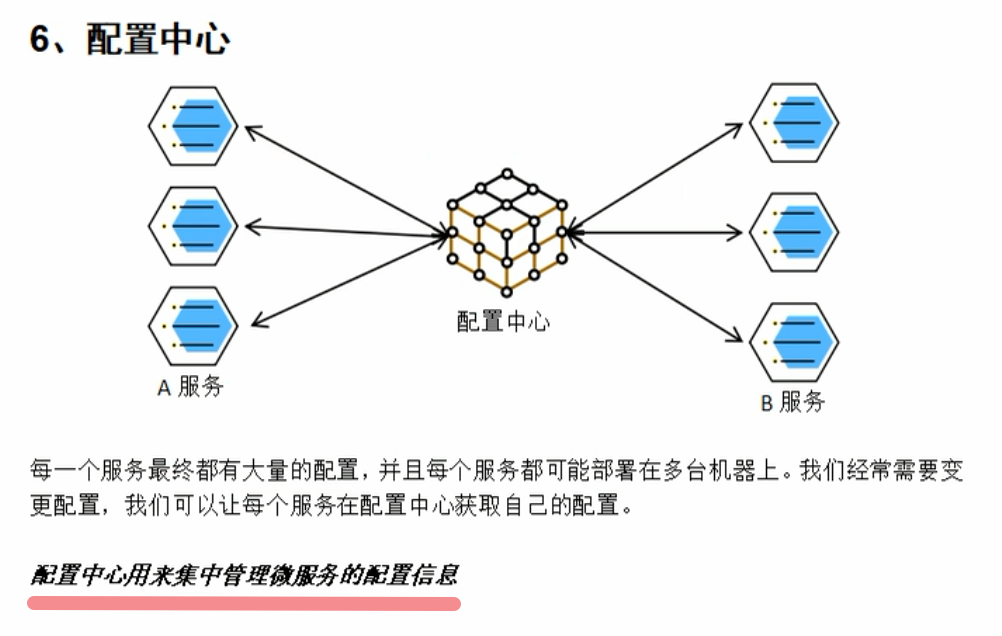
服务注册/发现&注册中心
A服务调用B服务,A服务并不知道B服务当前在哪几台服务器有,那些是正常的,那些服务已经下线。解决这个问题可以引入注册中心。
配置中心用来几种管理微服务的配置信息。
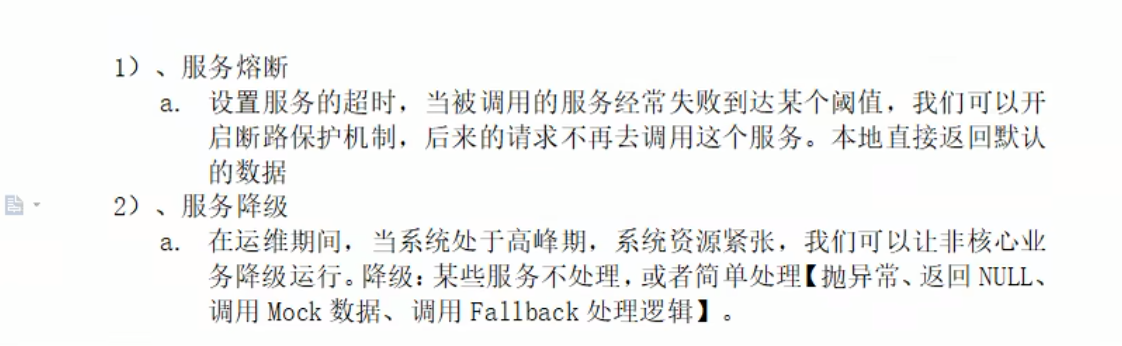
服务熔断&服务降级
在微服务架构中,微服务之间通过网络进行通信,存在相互依赖,当其中一个服务不可用时,有可能会造成雪崩效应。要防止这样的情况,必须要有容错机制来保护服务。
rpc远程调用情景:
订单服务 --> 商品服务 --> 库存服务
库存服务出现故障导致响应慢,导致商品服务需要等待,可能等到10s后库存服务才能响应。库存服务的不可用导致商品服务阻塞,商品服务等的期间,订单服务也处于阻塞。一个服务不可用导致整个服务链都阻塞。如果是高并发,第一个请求调用后阻塞10s得不到结果,第二个请求直接阻塞10s。更多的请求进来导致请求积压,全部阻塞,最终服务器的资源耗尽。导致雪崩
解决方案:
1 服务熔断
指定超时时间,库存服务3s没有响应就超时,如果经常失败,比如10s内100个请求都失败了。开启断路保护机制,下一次请求进来不调用库存服务了,因为上一次100%错误都出现了,我们直接在此中断,商品服务直接返回,返回一些默认数据或者null,而不调用库存服务了,这样就不会导致请求积压。
设置服务的超时,当被调用的服务经常失败到达某个阈值,我们可以开启断路保护机制,后来的请求不再去调用这个服务。本地直接返回默认的数据
2 服务降级
在运维期间,当系统处于高峰期,系统资源紧张,我们可以让非核心业务降级运行。降级:某些服务不处理,或者处理简单【抛异常、返回NULL、调用Mock数据、调用Fallback处理逻辑】
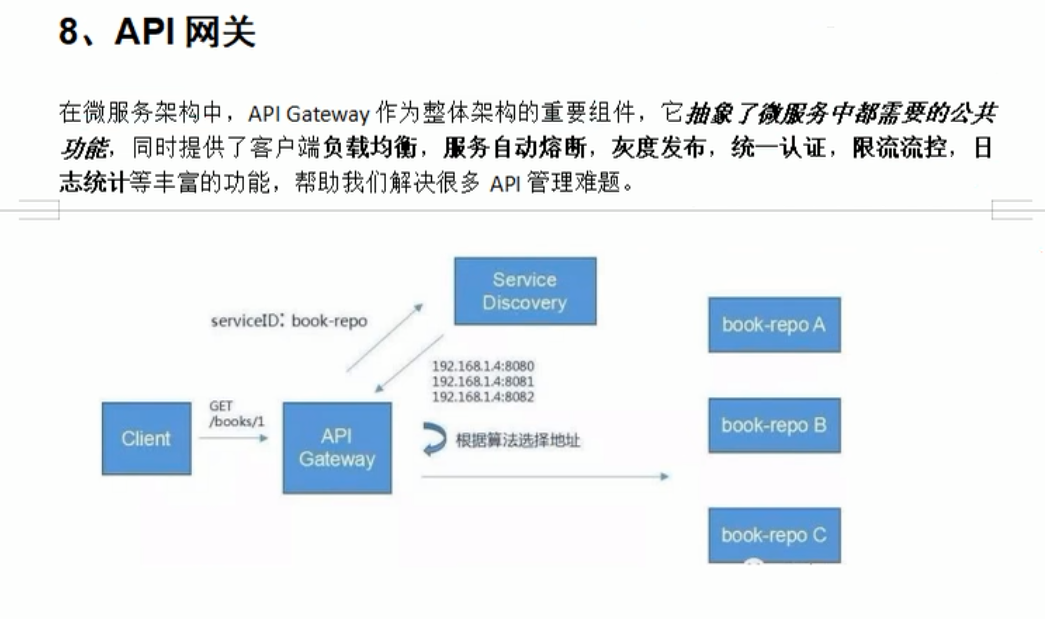
API网关
客户端发送请求到服务器路途中,设置一个网关,请求都先到达网关,网关对请求进行统一认证(合法非法)和处理等操作。他是安检。
在微服务架构中,API gateway作为整体架构的重要组件,它抽象了微服务中都需要的公共功能,同时提供了客户端负载均衡,服务自动熔断,灰度发布,统一认证,限流流控,日志统计等丰富的功能,帮助我们解决很多API管理难题。
前后分离开发,分为内网部署和外网部署,外网是面向公众访问的,部署前端项目,可以有手机APP,电脑网页;内网部署的是后端集群,前端在页面上操作发送请求到后端,在这途中会经过Nginx集群,Nginx把请求转交给API网关(springcloud gateway)(网关可以根据当前请求动态地路由到指定的服务,看当前请求是想调用商品服务还是购物车服务还是检索),从路由过来如果请求很多,可以负载均衡地调用商品服务器中一台(商品服务复制了多份),当商品服务器出现问题也可以在网关层面对服务进行熔断或降级(使用阿里的sentinel组件),网关还有其他的功能如认证授权、限流(只放行部分到服务器)等。
到达服务器后进行处理(springboot为微服务),服务与服务可能会相互调用(使用OpenFeign组件),有些请求可能经过登录才能进行(基于OAuth2.0的认证中心。安全和权限使用springSecurity控制)
服务可能保存了一些数据或者需要使用缓存,我们使用redis集群(分片+哨兵集群)。持久化使用mysql,读写分离和分库分表。
服务和服务之间会使用消息队列(RabbitMQ),来完成异步解耦,分布式事务的一致性。有些服务可能需要全文检索,检索商品信息,使用ElaticSearch。
服务可能需要存取数据,使用阿里云的对象存储服务OSS。
项目上线后为了快速定位问题,使用ELK对日志进行处理,使用LogStash收集业务里的各种日志,把日志存储到ES中,用Kibana可视化页面从ES中检索出相关信息,帮助我们快速定位问题所在。
在分布式系统中,由于我们每个服务都可能部署在很多台机器,服务和服务可能相互调用,就得知道彼此都在哪里,所以需要将所有服务都注册到注册中心。服务从注册中心发现其他服务所在位置(使用阿里Nacos作为注册中心)。
每个服务的配置众多,为了实现改一处配置相同配置就同步更改,就需要配置中心,也使用阿里的Nacos,服务从配置中心中动态取配置。
服务追踪,追踪服务调用链哪里出现问题,使用springcloud提供的Sleuth、Zipkin、Metrics,把每个服务的信息交给开源的Prometheus进行聚合分析,再由Grafana进行可视化展示,提供Prometheus提供的AlterManager实时得到服务的告警信息,以短信/邮件的方式告知服务开发人员。
还提供了持续集成和持续部署。项目发布起来后,因为微服务众多,每一个都打包部署到服务器太麻烦,有了持续集成后开发人员可以将修改后的代码提交到github,运维人员可以通过自动化工具Jenkins Pipeline将github中获取的代码打包成docker镜像,最终是由k8s集成docker服务,将服务以docker容器的方式运行。
微服务划分图
反映了需要创建的微服务以及相关技术。
前后分离开发。前端项目分为admin-vue(工作人员使用的后台管理系统)、shop-vue(面向公众访问的web网站)、app(公众)、小程序(公众)
商品服务:商品的增删改查、商品的上下架、商品详情
支付服务
优惠服务
用户服务:用户的个人中心、收货地址
仓储服务:商品的库存
秒杀服务:定时任务与redis
订单服务:订单增删改查、验价、幂等性token
检索服务:商品的检索ES
中央认证服务:登录、注册、单点登录、社交登录
购物车服务:redis
后台管理系统:添加优惠信息等
三、linux环境搭建
visualBox进行安装需要cpu开启虚拟化,在开机启动的时候设置主板,CPU configuration,然后点击Intel Vitualization Technology。重启电脑
普通安装linux虚拟机太麻烦,可以利用vagrant可以帮助我们快速地创建一个虚拟机。主要装了vitualbox,vagrant可以帮助我们快速创建出一个虚拟机。他有一个镜像仓库。
去https://www.vagrantup.com/ 下载vagrant安装,安装后重启系统。cmd中输入vagrant有版本代表成功了。
输入vagrant init centos/7,即可初始化一个centos7系统。(注意这个命令在哪个目录下执行的,他的Vagrantfile就生成在哪里)
vagrant up启动虚拟机环境。
启动后出现default folder:/cygdrive/c/User/… =>/vagrant。然后ctrl+c退出
前面的页面中有ssh账号信息。vagrant ssh 就会连上虚拟机。可以使用exit退出
下次使用也可以直接vagrant up直接启动,但要确保当前目录在C:/用户/ 文件夹下,他下面有一个Vagrantfile,不过我们也可以配置环境变量。
启动后再次vagrant ssh连上即可
不过他使用的网络方式是网络地址转换NAT(端口转发),如果其他主机要访问虚拟机,必须由windows端口如3333断发给虚拟机端口如3306。这样每在linux里安一个软件都要进行端口映射,不方便,(也可以在virualBox里挨个设置)。我们想要给虚拟机一个固定的ip地址,windows和虚拟机可以互相ping通。
visualBox的网络模式可以参考:https://mp.weixin.qq.com/s?__biz=MzI5MDg4ODEzOA==&mid=2247488277&idx=1&sn=012c33bec2984a61850b30b1bb270812&scene=21#wechat_redirect
方式1是在虚拟机中配置静态ip。
方式2:更改Vagrantfile更改虚拟机ip,修改其中的config.vm.network "private_network",ip:"192.168.56.10",这个ip需要在windows的ipconfig中查到vitualbox的虚拟网卡ip,然后更改下最后一个数字就行(不能是1,1是我们的主机)。配置完后vagrant reload重启虚拟机。在虚拟机中ip addr就可以查看到地址了。互相ping也能ping通。
关掉防火墙,VirualBox中第一个网卡设置NAT,第二个网卡设置仅主机
如果ping不了baidu
cd /etc/sysconfig/network-scripts
ls 一般有ifcfg-eth0 1
ip addr 看哪个网格是192.168.56网段,然后vim他
vim ifcfg-eth1 加入
GATEWAY=192.168.56.X
DNS1=114.114.114.114
DNS2=8.8.8.8
service network restart
默认只允许ssh登录方式,为了后来操作方便,文件上传等,我们可以配置允许账号密码登录
vim /etc/ssh/sshd_config
修改
PasswordAuthentication yes
重启
service sshd restart
账号root
密码vagrant
配置源
# 备份原yum源
mv /etc/yum.repos.d/CentOS-Base.repo /etc/yum.repos.d/CentOS-Base.repo.backup
# 使用新yum源
curl -o /etc/yum.repos.d/CentOS-Base.repo http://mirrors.163.com/.help/CentOS7-Base-163.repo
# 生成缓存
yum makecache
虚拟机安装docker
https://docs.docker.com/engine/install/centos/
#卸载系统之前的docker
sudo yum remove docker \
docker-client \
docker-client-latest \
docker-common \
docker-latest \
docker-latest-logrotate \
docker-logrotate \
docker-engine
sudo yum install -y yum-utils
# 配置镜像
sudo yum-config-manager \
--add-repo \
https://download.docker.com/linux/centos/docker-ce.repo
sudo yum install docker-ce docker-ce-cli containerd.io
sudo systemctl start docker
# 设置开机自启动
sudo systemctl enable docker
docker -v
sudo docker images
https://cr.console.aliyun.com/cn-qingdao/instances/mirrors
根据页面命令执行完命令
sudo mkdir -p /etc/docker
sudo tee /etc/docker/daemon.json <<-'EOF'
{
"registry-mirrors": ["https://chqac97z.mirror.aliyuncs.com"]
}
EOF
sudo systemctl daemon-reload
sudo systemctl restart docker
安装mysql-docker
用docker安装上mysql,去docker仓库里搜索mysql
Redis
如果直接挂载的话docker会以为挂载的是一个目录,所以我们先创建一个文件然后再挂载,在虚拟机中。
# 在虚拟机中
mkdir -p /mydata/redis/conf
touch /mydata/redis/conf/redis.conf
docker pull redis
docker run -p 6379:6379 --name redis \
-v /mydata/redis/data:/data \
-v /mydata/redis/conf/redis.conf:/etc/redis/redis.conf \
-d redis redis-server /etc/redis/redis.conf
# 直接进去redis客户端。
docker exec -it redis redis-cli
从0搭建
在码云新建仓库,仓库名mall,选择语言java,在.gitignore选中maven(就会忽略掉maven一些个人无需上传的配置文件),许可证选Apache-2.0,开发模型选生成/开发模型,开发时在dev分支,发布时在master分支,创建。
在IDEA中New–Project from version control–git–复制仓库地址
IDEA然后New Module–Spring Initializer , Artifact填 gulimall-product。Next—选择web(web开发),springcloud routing里选中openFeign(rpc调用)。
依次创建出以下服务模块
商品服务product
存储服务ware
订单服务order
优惠券服务coupon
用户服务member
开始开发,首先是数据库,之后我们使用人人代码生成器生成代码,以及后台管理系统
但是过程中出现报错
'parent.relativePath' of POM io.renren:renren-fast:3.0.0 (D:\Program Files\code\iversonmall\renren-fast\pom.xml) points at com.study:mall instead of org.springframework.boot:spring-boot-starter-parent, please verify your project structure
原因是因为:没有指定
relativePath:
1)指定查找该父项目pom.xml的(相对)路径。默认顺序:relativePath > 本地仓库 > 远程仓库
2)没有relativePath标签等同…/pom.xml, 即默认从当前pom文件的上一级目录找
3)表示不从relativePath找, 直接从本地仓库找,找不到再从远程仓库找
关于2)经过测试,似乎 没有relativePath标签时,它没有从当前pom文件的上一级目录找,子模块继承不到父模块中dependencyManagement中包的version信息。
因此,强烈推荐,子模块配置relativePath元素,指定 …/pom.xml。
六、数据库
因为已经有人贡献sql文件了,所以我们不理会下面引用部分的内容了。
安装powerDesigner软件。http://forspeed.onlinedown.net/down/powerdesigner1029.zip
其他软件:
https://www.lanzous.com/b015ag33e
密码:2wre
所有的数据库数据再复杂也不建立外键,因为在电商系统里,数据量大,做外键关联很耗性能。
name是给我们看的,code才是数据库里真正的信息。
选择primary和identity作为主键。然后点preview就可以看到生成这张表的语句。
点击菜单栏database–generate database—点击确定
找到视频评论区的sql文件,打开sqlyog软件,链接(linux里的mysql docker镜像)192.168.56.10,账号密码root。
注意重启虚拟机和docker后里面的容器就关了。
sudo docker ps
sudo docker ps -a
# 这两个命令的差别就是后者会显示 【已创建但没有启动的容器】
# 我们接下来设置我们要用的容器每次都是自动启动
sudo docker update redis --restart=always
sudo docker update mysql --restart=always
# 如果不配置上面的内容的话,我们也可以选择手动启动
sudo docker start mysql
sudo docker start redis
# 如果要进入已启动的容器
sudo docker exec -it mysql /bin/bash
# /bin/bash就是进入一般的命令行,如果改成redis就是进入了redis
然后接着去sqlyog执行我们的操作,在左侧root上右键建立数据库:字符集选utf8mb4,他能兼容utf8且能解决一些乱码的问题。分别建立了下面数据库(根据自己情况来)
gulimall-oms
gulimall-pms
gulimall-sms
gulimall-ums
gulimall-wms
然后打开对应的sql在对应的数据库中执行。依次执行。(注意sql文件里没有建库语句)
VSCode准备
点击执行sql脚本,依次选择评论区给的压缩包里的sql语句
七、人人项目npm
1 自己搭建的方式
在码云上搜索人人开源,我们使用renren-fast(后端)、renren-fast-vue(前端)项目。
https://gitee.com/renrenio
git clone https://gitee.com/renrenio/renren-fast.git
git clone https://gitee.com/renrenio/renren-fast-vue.git
下载到了桌面,我们把renren-fast移动到我们的项目文件夹(删掉.git文件),而renren-vue是用VSCode打开的(后面再弄)
在IDEA项目里的pom.xml添加一个renrnen-fast
<modules>
<module>gulimall-coupon</module>
<module>gulimall-member</module>
<module>gulimall-order</module>
<module>gulimall-product</module>
<module>gulimall-ware</module>
<module>renren-fast</module>
</modules>
然后打开renren-fast/db/mysql.sql,复制全部,在sqlyog中创建库guli-admin,粘贴刚才的内容执行。
然后修改项目里renren-fast中的application.yml,修改application-dev.yml中的数库库的url,通常把localhost修改为192.168.56.10即可。然后该对后面那个数据库
url: jdbc:mysql://192.168.56.10:3306/guli_admin?useUnicode=true&characterEncoding=UTF-8&serverTimezone=Asia/Shanghai
username: root
password: root
然后运行该java项目下的RenrenApplication
浏览器输入http://localhost:8080/renren-fast/ 得到{“msg”:“invalid token”,“code”:401}就代表无误
人人vue(npm)
用VSCode打开renren-fast-vue(如果自己搭建的话),如果是运行完整的代码,可以去课件里找gulimall-admin-vue-app
安装node:http://nodejs.cn/download/ 选择windows下载。下载完安装。
可以去这里找到v12的版本。(不要用12.0,可以用12.1)
https://npm.taobao.org/mirrors/node/
NPM是随同NodeJS一起安装的包管理工具。JavaScript-NPM类似于java-Maven。
命令行输入node -v 检查配置好了,配置npm的镜像仓库地址,再执
node -v
npm config set registry http://registry.npm.taobao.org/
然后去VScode的项目终端中输入 npm install,是要去拉取依赖(package.json类似于pom.xml的dependency),但是会报错,然后进行如下操作:
启动fast-vue项目
结合下面的报错
P16 npm install报错问题
视频评论区没几个说对的,个人的各种分析写到了这里:
https://blog.csdn.net/hancoder/article/details/113821646
八、人人项目-逆向工程
逆向工程搭建
git clone https://gitee.com/renrenio/renren-generator.git
1
下载到桌面后,同样把里面的.git文件删除,然后移动到我们IDEA项目目录中,同样配置好pom.xml
<modules>
<module>gulimall-coupon</module>
<module>gulimall-member</module>
<module>gulimall-order</module>
<module>gulimall-product</module>
<module>gulimall-ware</module>
<module>renren-fast</module>
<module>renren-generator</module>
</modules>
在maven中刷新一下,让项目名变粗体,稍等下面进度条完成。
修改application.yml
url: jdbc:mysql://192.168.56.10:3306/gulimall-pms?useUnicode=true&characterEncoding=UTF-8&useSSL=false&serverTimezone=Asia/Shanghai
username: root
password: root
然后修改generator.properties(这里乱码的百度IDEA设置properties编码)
# 主目录
mainPath=com.atguigu
#包名
package=com.atguigu.gulimall
#模块名
moduleName=product
#作者
author=hh
#email
email=55333@qq.com
#表前缀(类名不会包含表前缀) # 我们的pms数据库中的表的前缀都pms
# 如果写了表前缀,每一张表对于的javaBean就不会添加前缀了
tablePrefix=pms_
运行RenrenApplication。如果启动不成功,修改application中是port为801。访问http://localhost:801/
在网页上下方点击每页显示50个(pms库中的表),以让全部都显示,然后点击全部,点击生成代码。下载了压缩包
解压压缩包,把main放到gulimall-product的同级目录下。
common
然后在项目上右击(在项目上右击很重要)new modules— maven—然后在name上输入gulimall-common。
在pom.xml中也自动添加了<module>gulimall-common</module>
在common项目的pom.xml中添加
<!-- mybatisPLUS-->
<dependency>
<groupId>com.baomidou</groupId>
<artifactId>mybatis-plus-boot-starter</artifactId>
<version>3.3.2</version>
</dependency>
<!--简化实体类,用@Data代替getset方法-->
<dependency>
<groupId>org.projectlombok</groupId>
<artifactId>lombok</artifactId>
<version>1.18.8</version>
</dependency>
<!-- httpcomponent包。发送http请求 -->
<dependency>
<groupId>org.apache.httpcomponents</groupId>
<artifactId>httpcore</artifactId>
<version>4.4.13</version>
</dependency>
<dependency>
<groupId>commons-lang</groupId>
<artifactId>commons-lang</artifactId>
<version>2.6</version>
</dependency>
我们把每个微服务里公共的类和依赖放到common里。
tips: shift+F6修改项目名
此外,说下maven依赖的问题。
<dependency>代表本项目依赖,子项目也依赖
如果有个<optional>标签,代表本项目依赖,但是子项目不依赖,即不传递依赖
然后在product项目中的pom.xml中加入下面内容,作为common的子项目
<dependency>
<groupId>com.atguigu.gulimall</groupId>
<artifactId>gulimall-common</artifactId>
<version>0.0.1-SNAPSHOT</version>
</dependency>
复制renren-fast----utils包下的Query和PageUtils、R、Constant复制到common项目的java/com.atguigu.common.utils下。
关于R为什么可以序列化的疑问:
之前我在思考R类为什么可以RPC传输的问题,R类继承了hashmap,你会发现map里的table[]数组是transient的,也就是不序列化的。那么是如何网络传输的呢?
在探索的过程中我也被clone方法误导了一下,为了重试内容,我这里贴出来Clone的知识吧:HashMap实现了Clonable接口且重写了clone()方法,我们可以大致看出来就是先调用了父类的clone()方法,然后强转,最后把元素设置进去。
public class HashMap<K,V> extends AbstractMap<K,V>
implements Map<K,V>, Cloneable, Serializable {
// 不序列化
transient Node<K,V>[] table;
@Override
public Object clone() {
HashMap<K,V> result;
try {
/*
最终调用的是Object.clone(),注释说明内容:
Object.clone()是一种浅拷贝,即对基础类型直接复制,和引用类型的成员变量值拷贝的仅仅的地址,也就是并不会递归式克隆。
该方法关键字有几个信息:必须继承Cloneable才能调用clone()方法;只能在子类中才能调用super.clone();方法返回Object对象,需要强转
protected native Object clone() throws CloneNotSupportedException;
*/
result = (HashMap<K,V>)super.clone();
} catch (CloneNotSupportedException e) {
// this shouldn't happen, since we are Cloneable
throw new InternalError(e);
}
result.reinitialize();
result.putMapEntries(this, false);
return result;
}
再回到原来的问题,table[]数组是transient的,那怎么序列化呢?我目前的认知是其实跟clone没有关系,而是与另一个序列化方法有关系:writeObject()
private void writeObject(java.io.ObjectOutputStream s)
throws IOException {
int buckets = capacity();
// Write out the threshold, loadfactor, and any hidden stuff
s.defaultWriteObject();
s.writeInt(buckets);
s.writeInt(size);
// 这个方法会遍历元素写入流中
internalWriteEntries(s);
}
看一下该方法,我们可以大概看出,其实写入流中时,并不写入数组(如果只有一个元素却要写入数组会很浪费空间),而是先往流中写入原来的map中的容量和结点元素的个数,这样另一端输出时就知道要接收多少Entry(Node结点)了。然后把数组中的元素一次写入到流中,另一端就彻底完成了map的复制(可以看看readObject()方法)。
把@RequiresPermissions这些注解掉,因为是shiro的
复制renren-fast中的xss包粘贴到common的com.atguigu.common目录下。
还复制了exception文件夹,对应的位置关系自己观察一下就行
注释掉product项目下类中的//import org.apache.shiro.authz.annotation.RequiresPermissions;,他是shiro的东西
注释renren-generator\src\main\resources\template/Controller中所有的@RequiresPermissions。## import org.apache.shiro.authz.annotation.RequiresPermissions;
总之什么报错就去fast里面找。重启逆向工程。重新在页面上得到压缩包。重新解压出来,不过只把里面的controller复制粘贴到product项目对应的目录就行。
测试
测试与整合商品服务里的mybatisplus
https://mp.baomidou.com/guide/quick-start.html#配置
在common的pom.xml中导入
<!-- 数据库驱动 https://mvnrepository.com/artifact/mysql/mysql-connector-java -->
<dependency>
<groupId>mysql</groupId>
<artifactId>mysql-connector-java</artifactId>
<version>8.0.17</version>
</dependency>
<!--tomcat里一般都带-->
<dependency>
<groupId>javax.servlet</groupId>
<artifactId>servlet-api</artifactId>
<version>2.5</version>
<scope>provided</scope>
</dependency>
删掉common里xss/xssfiler和XssHttpServletRequestWrapper
在product项目的resources目录下新建application.yml
spring:
datasource:
username: root
password: root
url: jdbc:mysql://192.168.56.10:3306/gulimall-pms
driver-class-name: com.mysql.jdbc.Driver
# MapperScan
# sql映射文件位置
mybatis-plus:
mapper-locations: classpath:/mapper/**/*.xml
global-config:
db-config:
id-type: auto
classpath 和 classpath* 区别:
classpath:只会到你的class路径中查找找文件;
classpath*:不仅包含class路径,还包括jar文件中(class路径)进行查找
classpath*的使用:当项目中有多个classpath路径,并同时加载多个classpath路径下(此种情况多数不会遇到)的文件,*就发挥了作用,如果不加*,则表示仅仅加载第一个classpath路径。
然而执行后能通过,但是数据库中文显示乱码,所以我模仿逆向工程,把上面的配置url改为
url: jdbc:mysql://192.168.56.10:3306/guli_pms?useUnicode=true&characterEncoding=UTF-8&useSSL=false&serverTimezone=Asia/Shanghai
1
正常了。
然后在主启动类上加上注解@MapperScan()
@MapperScan("com.atguigu.gulimall.product.dao")
@SpringBootApplication
public class gulimallProductApplication {
public static void main(String[] args) {
SpringApplication.run(gulimallProductApplication.class, args);
}
}
然后去测试,先通过下面方法给数据库添加内容
@SpringBootTest
class gulimallProductApplicationTests {
@Autowired
BrandService brandService;
@Test
void contextLoads() {
BrandEntity brandEntity = new BrandEntity();
brandEntity.setDescript("哈哈1哈");
brandEntity.setName("华为");
brandService.save(brandEntity);
System.out.println("保存成功");
}
}
在数据库中就能看到新增数据了
@SpringBootTest
class gulimallProductApplicationTests {
@Autowired
BrandService brandService;
@Test
void contextLoads() {
BrandEntity brandEntity = new BrandEntity();
brandEntity.setBrandId(1L);
brandEntity.setDescript("修改");
brandService.updateById(brandEntity);
}
}
coupon
优惠券服务。重新打开generator逆向工程,修改generator.properties
# 主目录
mainPath=com.atguigu
#包名
package=com.atguigu.gulimall
#模块名
moduleName=coupon
#作者
autho=hh
#email
email=55333@qq.com
#表前缀(类名不会包含表前缀) # 我们的pms数据库中的表的前缀都pms
# 如果写了表前缀,每一张表对于的javaBean就不会添加前缀了
tablePrefix=sms_
修改yml数据库信息
spring:
datasource:
username: root
password: root
url: jdbc:mysql://192.168.56.10:3306/gulimall-sms?useUnicode=true&characterEncoding=UTF-8&useSSL=false&serverTimezone=Asia/Shanghai
driver-class-name: com.mysql.cj.jdbc.Driver
mybatis-plus:
mapper-locations: classpath:/mapper/**/*.xml
global-config:
db-config:
id-type: auto
logic-delete-value: 1
logic-not-delete-value: 0
server:
port: 7000
端口号后面会设置,这里提前设置好了
启动生成RenrenApplication.java,运行后去浏览器80端口查看,同样让他一页全显示后选择全部后生成。生成后解压复制到coupon项目对应目录下。
让coupon也依赖于common,修改pom.xml
<dependency>
<groupId>com.atguigu.gulimall</groupId>
<artifactId>gulimall-common</artifactId>
<version>0.0.1-SNAPSHOT</version>
</dependency>
resources下src包先删除
添加application.yml
spring:
datasource:
username: root
password: root
url: jdbc:mysql://192.168.56.10:3306/gulimall-sms?useUnicode=true&characterEncoding=UTF-8&useSSL=false&serverTimezone=Asia/Shanghai
driver-class-name: com.mysql.cj.jdbc.Driver
mybatis-plus:
mapper-locations: classpath:/mapper/**/*.xml
global-config:
db-config:
id-type: auto
logic-delete-value: 1
logic-not-delete-value: 0
运行gulimallCouponApplication.java
隔了好几个月的注:直接clone别人的项目这里可能运行不起来。。。因为如后面依赖了nacos等服务,克隆的话这里暂时运行不起来。
http://localhost:7000/coupon/coupon/list
{"msg":"success","code":0,"page":{"totalCount":0,"pageSize":10,"totalPage":0,"currPage":1,"list":[]}}
1
member
重新使用逆向工程生成ums数据库相关的代码
模仿上面修改下面两个配置
代码生成器里:
url: jdbc:mysql://192.168.56.10:3306/gulimall-ums?useUnicode=true&characterEncoding=UTF-8&useSSL=false&serverTimezone=Asia/Shanghai
1
# 主目录
mainPath=com.atguigu
#包名
package=com.atguigu.gulimall
#模块名
moduleName=member
#作者
author=hh
#email
email=55333@qq.com
#表前缀(类名不会包含表前缀) # 我们的pms数据库中的表的前缀都pms
# 如果写了表前缀,每一张表对于的javaBean就不会添加前缀了
tablePrefix=ums_
重启RenrenApplication.java,然后同样去浏览器获取压缩包解压到对应member项目目录
member也导入依赖
<dependency>
<groupId>com.atguigu.gulimall</groupId>
<artifactId>gulimall-common</artifactId>
<version>0.0.1-SNAPSHOT</version>
</dependency>
同样新建application.yml
spring:
datasource:
username: root
password: root
url: jdbc:mysql://192.168.56.10:3306/gulimall-ums?useUnicode=true&characterEncoding=UTF-8&useSSL=false&serverTimezone=Asia/Shanghai
driver-class-name: com.mysql.cj.jdbc.Driver
mybatis-plus:
mapper-locations: classpath:/mapper/**/*.xml
global-config:
db-config:
id-type: auto
logic-delete-value: 1
logic-not-delete-value: 0
server:
port: 8000
order端口是9000,product是10000,ware是11000。
以后比如order系统要复制多份,他的端口计算9001、9002。。。
重启web后,http://localhost:8000/member/growthchangehistory/list
{"msg":"success","code":0,"page":{"totalCount":0,"pageSize":10,"totalPage":0,"currPage":1,"list":[]}}
1
order
修改代码生成器
url: jdbc:mysql://192.168.56.10:3306/gulimall-oms?useUnicode=true&characterEncoding=UTF-8&useSSL=false&serverTimezone=Asia/Shanghai
1
#代码生成器,配置信息
# 主目录
mainPath=com.atguigu
#包名
package=com.atguigu.gulimall
#模块名
moduleName=order
#作者
author=hh
#email
email=55333@qq.com
#表前缀(类名不会包含表前缀) # 我们的pms数据库中的表的前缀都pms
# 如果写了表前缀,每一张表对于的javaBean就不会添加前缀了
tablePrefix=oms_
15
运行RenrenApplication.java重新生成后去下载解压放置。
application.yml
spring:
datasource:
username: root
password: root
url: jdbc:mysql://192.168.56.10:3306/gulimall-oms?useUnicode=true&characterEncoding=UTF-8&useSSL=false&serverTimezone=Asia/Shanghai
driver-class-name: com.mysql.cj.jdbc.Driver
mybatis-plus:
mapper-locations: classpath:/mapper/**/*.xml
global-config:
db-config:
id-type: auto
logic-delete-value: 1
logic-not-delete-value: 0
server:
port: 9000
POMxml
<dependency>
<groupId>com.atguigu.gulimall</groupId>
<artifactId>gulimall-common</artifactId>
<version>0.0.1-SNAPSHOT</version>
</dependency>
启动gulimallOrderApplication.java
http://localhost:9000/order/order/list
{"msg":"success","code":0,"page":{"totalCount":0,"pageSize":10,"totalPage":0,"currPage":1,"list":[]}}
1
ware
修改代码生成器
url: jdbc:mysql://192.168.56.10:3306/gulimall-wms?useUnicode=true&characterEncoding=UTF-8&useSSL=false&serverTimezone=Asia/Shanghai
#代码生成器,配置信息
# 主目录
mainPath=com.atguigu
#包名
package=com.atguigu.gulimall
#模块名
moduleName=ware
#作者
author=hh
#email
email=55333@qq.com
#表前缀(类名不会包含表前缀) # 我们的pms数据库中的表的前缀都pms
# 如果写了表前缀,每一张表对于的javaBean就不会添加前缀了
tablePrefix=wms_
1
运行RenrenApplication.java重新生成后去下载解压放置。
application.yml
spring:
datasource:
username: root
password: root
url: jdbc:mysql://192.168.56.10:3306/gulimall-wms?useUnicode=true&characterEncoding=UTF-8&useSSL=false&serverTimezone=Asia/Shanghai
driver-class-name: com.mysql.cj.jdbc.Driver
mybatis-plus:
mapper-locations: classpath:/mapper/**/*.xml
global-config:
db-config:
id-type: auto
logic-delete-value: 1
logic-not-delete-value: 0
server:
port: 11000
POMxml
<dependency>
<groupId>com.atguigu.gulimall</groupId>
<artifactId>gulimall-common</artifactId>
<version>0.0.1-SNAPSHOT</version>
</dependency>
启动gulimallWareApplication.java
http://localhost:11000/ware/wareinfo/list
{"msg":"success","code":0,"page":{"totalCount":0,"pageSize":10,"totalPage":0,"currPage":1,"list":[]}}
1
九、SpringCloud Alibaba简介
springcloud个人笔记:https://blog.csdn.net/hancoder/article/details/109063671
阿里18年开发的微服务一站式解决方案。https://github.com/alibaba/spring-cloud-alibaba/blob/master/README-zh.md
注册中心:nacos
配置中心:nacos
网关:gateway
远程调用:netflix把feign闭源了,spring cloud开了个openFeign
在common的pom.xml中加入
<dependencyManagement>
<dependencies>
<dependency>
<groupId>com.alibaba.cloud</groupId>
<artifactId>spring-cloud-alibaba-dependencies</artifactId>
<version>2.2.0.RELEASE</version>
<type>pom</type>
<scope>import</scope>
</dependency>
</dependencies>
</dependencyManagement>
上面是dependencyManagement依赖管理,相当于以后在dependencies里引spring cloud alibaba就不用写版本号。注意他和普通依赖的区别,他只是备注一下,并没有加入依赖
十、Nacos-8848
springcloud个人笔记:https://blog.csdn.net/hancoder/article/details/109063671
一个更易于构建云原生应用的动态服务发现、配置管理和服务管理平台。
nacos作为我们的注册中心和配置中心。
注册中心文档:https://github.com/alibaba/spring-cloud-alibaba/tree/master/spring-cloud-alibaba-examples/nacos-example/nacos-discovery-example
其他文档在该项目上层即可找到,下面读一读官网给的介绍就会用了。
安装启动nacos:下载–解压–双击bin/startup.cmd。http://127.0.0.1:8848/nacos/ 账号密码nacos
自己搭建nacos源码(推荐):https://blog.csdn.net/xiaotian5180/article/details/105478543
为了能git管理nacos及其内置的数据库,我们采用这种方式,方便你运行时也保留原有内置数据库内容
Linux/Unix/Mac 操作系统,执行命令 sh startup.sh -m standalone
使用nacos:
在某个项目里properties里写spring.cloud.nacos.discovery.server-addr=127.0.0.1:8848(yaml同理,指定nacos的地址)。再指定applicatin.name告诉注册到nacos中以什么命名
依赖:放到common里,不写版本是因为父项目或spring-cloud里面有了版本管理
<dependency>
<groupId>com.alibaba.cloud</groupId>
<artifactId>spring-cloud-starter-alibaba-nacos-discovery</artifactId>
</dependency>
使用 @EnableDiscoveryClient 注解开启服务注册与发现功能
@SpringBootApplication
@EnableDiscoveryClient //
public class ProviderApplication {
public static void main(String[] args) {
SpringApplication.run(Application.class, args);
}
@RestController
class EchoController {
@GetMapping(value = "/echo/{string}")
public String echo(@PathVariable String string) {
return string;
}
}
}
最后application.yml内容,配置了服务中心名和当前模块名字
spring:
datasource:
username: root
password: root
url: jdbc:mysql://192.168.56.10:3306/gulimall-sms?useUnicode=true&characterEncoding=UTF-8&useSSL=false&serverTimezone=Asia/Shanghai
driver-class-name: com.mysql.cj.jdbc.Driver
cloud:
nacos:
discovery:
server-addr: 127.0.0.1:8848
application:
name: gulimall-coupon
mybatis-plus:
mapper-locations: classpath:/mapper/**/*.xml
global-config:
db-config:
id-type: auto
logic-delete-value: 1
logic-not-delete-value: 0
server:
port: 7000
然后依次给member、配置上面的yaml,改下name就行。再给每个项目配置类上加上注解@EnableDiscoveryClient
nacos测试:
测试member和coupon的远程调用
想要获取当前会员领取到的所有优惠券。先去注册中心找优惠券服务,注册中心调一台优惠券服务器给会员,会员服务器发送请求给这台优惠券服务器,然后对方响应。
服务请求方发送了2次请求,先问nacos要地址,然后再请求
十一、Feign(远程调用)与注册中心
声明式远程调用
feign是一个声明式的HTTP客户端,他的目的就是让远程调用更加简单。给远程服务发的是HTTP请求。
会员服务想要远程调用优惠券服务,只需要给会员服务里引入openfeign依赖,他就有了远程调用其他服务的能力。
pom.xml
<dependency>
<groupId>org.springframework.cloud</groupId>
<artifactId>spring-cloud-starter-openfeign</artifactId>
</dependency>
我们之前在member的pom.xml已经引用过了(微服务)。
在coupon中修改如下的内容
@RequestMapping("coupon/coupon")
public class CouponController {
@Autowired
private CouponService couponService;
@RequestMapping("/member/list")
public R membercoupons(){ //全系统的所有返回都返回R
// 应该去数据库查用户对于的优惠券,但这个我们简化了,不去数据库查了,构造了一个优惠券给他返回
CouponEntity couponEntity = new CouponEntity();
couponEntity.setCouponName("满100-10");//优惠券的名字
return R.ok().put("coupons",Arrays.asList(couponEntity));
}
这样我们准备好了优惠券的调用内容
在member的配置类上加注解@EnableDiscoveryClient,告诉member是一个远程调用客户端,member要调用东西的
/*
* 想要远程调用的步骤:
* 1 引入openfeign
* 2 编写一个接口,接口告诉springcloud这个接口需要调用远程服务
* 2.1 在接口里声明@FeignClient("gulimall-coupon")他是一个远程调用客户端且要调用coupon服务
* 2.2 要调用coupon服务的/coupon/coupon/member/list方法
* 3 开启远程调用功能 @EnableFeignClients,要指定远程调用功能放的基础包
* */
@EnableFeignClients(basePackages="com.atguigu.gulimall.member.feign")//扫描接口方法注解
@EnableDiscoveryClient// 注册到nacos
@SpringBootApplication
public class gulimallMemberApplication {
public static void main(String[] args) {
SpringApplication.run(gulimallMemberApplication.class, args);
}
}
那么要调用什么东西呢?就是我们刚才写的优惠券的功能,复制函数部分,在member的com.atguigu.gulimall.member.feign包下新建类:
@FeignClient("gulimall-coupon") //告诉spring cloud这个接口是一个远程客户端,要调用coupon服务(nacos中找到),具体是调用coupon服务的/coupon/coupon/member/list对应的方法
public interface CouponFeignService {
// 远程服务的url
@RequestMapping("/coupon/coupon/member/list")//注意写全优惠券类上还有映射//注意我们这个地方不是控制层,所以这个请求映射请求的不是我们服务器上的东西,而是nacos注册中心的
public R membercoupons();//得到一个R对象
}
@FeignClient+@RequestMapping构成远程调用的坐标
其他类中看似只是调用了CouponFeignService.membercoupons(),而实际上该方法跑去nacos里和rpc里调用了才拿到东西返回
然后我们在member的控制层写一个测试请求
@RestController
@RequestMapping("member/member")
public class MemberController {
@Autowired
private MemberService memberService;
@Autowired
CouponFeignService couponFeignService;
@RequestMapping("/coupons")
public R test(){
MemberEntity memberEntity = new MemberEntity();
memberEntity.setNickname("会员昵称张三");
R membercoupons = couponFeignService.membercoupons();//假设张三去数据库查了后返回了张三的优惠券信息
//打印会员和优惠券信息
return R.ok().put("member",memberEntity).put("coupons",membercoupons.get("coupons"));
}
重新启动服务刷新容器
测试:http://localhost:8000/member/member/coupons
{
"msg":"success",
"code":0,
"coupons":[
{"id":null,"couponType":null,"couponImg":null,
"couponName":"满100-10","num":null,"amount":null,"perLimit":null,
"minPoint":null,"startTime":null,"endTime":null,"useType":null,
"note":null,"publishCount":null,"useCount":null,"receiveCount":null,
"enableStartTime":null,"enableEndTime":null,"code":null,
"memberLevel":null,"publish":null}
],
"member":{"id":null,"levelId":null,"username":null,"password":null,
"nickname":"会员昵称张三","mobile":null,"email":null,
"header":null,"gender":null,"birth":null,
"city":null,"job":null,"sign":null,"sourceType":null,
"integration":null,"growth":null,"status":null,"createTime":null}
}
上面讲的内容很重要,我们停留5分钟体会一下调用逻辑。
coupon里的R.ok()是什么,就是设置了个msg
public class R extends HashMap<String, Object> {//R继承了HashMap
// ok是个静态方法,new了一个R对象,并且
public static R ok(String msg) {
R r = new R();
r.put("msg", msg);//调用了super.put(key, value);,即hashmap的put
return r;
}
}
nacos作为配置中心
我们还可以用nacos作为配置中心。配置中心的意思是不在application.properties等文件中配置了,而是放到nacos配置中心公用,这样无需每台机器都改。
官方教程:https://github.com/alibaba/spring-cloud-alibaba/blob/master/spring-cloud-alibaba-examples/nacos-example/nacos-config-example/readme-zh.md
common中添加依赖 nacos配置中心
<dependency>
<groupId>com.alibaba.cloud</groupId>
<artifactId>spring-cloud-starter-alibaba-nacos-config</artifactId>
</dependency>
在coupons项目中创建/src/main/resources/bootstrap.properties ,这个文件是springboot里规定的,他优先级别application.properties高
# 改名字,对应nacos里的配置文件名
spring.application.name=gulimall-coupon
spring.cloud.nacos.config.server-addr=127.0.0.1:8848
还是原来我们使用配置的方式,只不过优先级变了,所以匹配到了nacos的配置
还是配合@Value注解使用
@RestController
@RequestMapping("coupon/coupon")
public class CouponController {
@Autowired
private CouponService couponService;
@Value("${coupon.user.name}")//从application.properties中获取//不要写user.name,他是环境里的变量
private String name;
@Value("${coupon.user.age}")
private Integer age;
@RequestMapping("/test")
public R test(){
return R.ok().put("name",name).put("age",age);
}
浏览器去nacos里的配置列表,点击+号,data ID:gulimall-coupon.properties,配置
# gulimall-coupon.properties
coupon.user.name="配置中心"
coupon.user.age=12
然后点击发布。重启coupon(生产中加入@RefreshScope即可),http://localhost:7000/coupon/coupon/test
{"msg":"success","code":0,"name":"配置中心","age":12}
1
但是修改肿么办?实际生产中不能重启应用。在coupon的控制层上加@RefreshScope
@RefreshScope
@RestController
@RequestMapping("coupon/coupon")
public class CouponController {
@Autowired
private CouponService couponService;
@Value("${coupon.user.name}")//从application.properties中获取//不要写user.name,他是环境里的变量
private String name;
@Value("${coupon.user.age}")
private Integer age;
@RequestMapping("/test")
public R test(){
return R.ok().put("name",name).put("age",age);
}
重启后(让注解生效),在nacos浏览器里修改配置,修改就可以观察到能动态修改了
nacos的配置内容优先于项目本地的配置内容。
配置中心进阶
在nacos浏览器中还可以配置:
命名空间:用作配置隔离。(一般每个微服务一个命名空间)
默认public。默认新增的配置都在public空间下
开发、测试、开发可以用命名空间分割。properties每个空间有一份。也可以为每个微服务配置一个命名空间,微服务互相隔离
在bootstrap.properties里配置(测试完去掉,学习不需要)
# 可以选择对应的命名空间 # 写上对应环境的命名空间ID
spring.cloud.nacos.config.namespace=b176a68a-6800-4648-833b-be10be8bab00
配置集:一组相关或不相关配置项的集合。
配置集ID:类似于配置文件名,即Data ID
配置分组:默认所有的配置集都属于DEFAULT_GROUP。双十一,618的优惠策略改分组即可
# 更改配置分组
spring.cloud.nacos.config.group=DEFAULT_GROUP
其他划分方案:
NameSpace:命名空间 默认为public,其作用可以用来实现环境隔离作用,比如我们的开发环境、测试环境、生产环境。
Group:默认分组为DEFAULT_GROUP,Group 可以将不同的微服务进行分组划分。
Service/DataId: 也就是微服务工程,一个微服务工程可以有多个集群中心,比如一个消费者工程可以使用两个中心,每个中心读取不同的配置文件,每个中心内可以有多个实例实现集群。。
最终方案:每个微服务创建自己的命名空间,然后使用配置分组区分环境(dev/test/prod)
加载多配置集
我们要把原来application.yml里的内容都分文件抽离出去。我们在nacos里创建好后,在coupons里指定要导入的配置即可。
bootstrap.properties
在其中用数组spring.cloud.nacos.config.extension-configs[]写明每个配置集
spring.application.name=gulimall-coupon
spring.cloud.nacos.config.server-addr=127.0.0.1:8848
# 可以选择对应的命名空间 # 写上对应环境的命名空间ID
spring.cloud.nacos.config.namespace=b176a68a-6800-4648-833b-be10be8bab00
# 更改配置分组
spring.cloud.nacos.config.group=dev
#新版本不建议用下面的了
#spring.cloud.nacos.config.ext-config[0].data-id=datasource.yml
#spring.cloud.nacos.config.ext-config[0].group=dev
#spring.cloud.nacos.config.ext-config[0].refresh=true
#spring.cloud.nacos.config.ext-config[1].data-id=mybatis.yml
#spring.cloud.nacos.config.ext-config[1].group=dev
#spring.cloud.nacos.config.ext-config[1].refresh=true
#spring.cloud.nacos.config.ext-config[2].data-id=other.yml
#spring.cloud.nacos.config.ext-config[2].group=dev
#spring.cloud.nacos.config.ext-config[2].refresh=true
spring.cloud.nacos.config.extension-configs[0].data-id=datasource.yml
spring.cloud.nacos.config.extension-configs[0].group=dev
spring.cloud.nacos.config.extension-configs[0].refresh=true
spring.cloud.nacos.config.extension-configs[1].data-id=mybatis.yml
spring.cloud.nacos.config.extension-configs[1].group=dev
spring.cloud.nacos.config.extension-configs[1].refresh=true
spring.cloud.nacos.config.extension-configs[2].data-id=other.yml
spring.cloud.nacos.config.extension-configs[2].group=dev
spring.cloud.nacos.config.extension-configs[2].refresh=true
输出内容有
2020-06-25 00:04:13.677 WARN 17936 --- [ main] c.a.c.n.c.NacosPropertySourceBuilder : Ignore the empty nacos configuration and get it based on dataId[gulimall-coupon] & group[dev]
2020-06-25 00:04:13.681 INFO 17936 --- [ main] b.c.PropertySourceBootstrapConfiguration :
Located property source: [
BootstrapPropertySource {name='bootstrapProperties-gulimall-coupon.properties,dev'},
BootstrapPropertySource {name='bootstrapProperties-gulimall-coupon,dev'},
BootstrapPropertySource {name='bootstrapProperties-other.yml,dev'},
BootstrapPropertySource {name='bootstrapProperties-mybatis.yml,dev'},
BootstrapPropertySource {name='bootstrapProperties-datasource.yml,dev'}]
十二、网关gateway-88
动态上下线:发送请求需要知道商品服务的地址,如果商品服务器有123服务器,1号掉线后,还得改,所以需要网关动态地管理,他能从注册中心中实时地感知某个服务上线还是下线。【先通过网关,网关路由到服务提供者】
拦截:请求也要加上询问权限,看用户有没有权限访问这个请求,也需要网关。
所以我们使用spring cloud的gateway组件做网关功能。
网关是请求流量的入口,常用功能包括路由转发,权限校验,限流控制等。springcloud gateway取代了zuul网关。
https://spring.io/projects/spring-cloud-gateway
参考手册:https://cloud.spring.io/spring-cloud-gateway/2.2.x/reference/html/
三大核心概念:
Route: The basic building block of the gateway. It is defined by an ID, a destination URI, a collection of predicates断言, and a collection of filters. A route is matched if the aggregate predicate is true.发一个请求给网关,网关要将请求路由到指定的服务。路由有id,目的地uri,断言的集合,匹配了断言就能到达指定位置,
Predicate断言: This is a Java 8 Function Predicate. The input type is a Spring Framework ServerWebExchange. This lets you match on anything from the HTTP request, such as headers or parameters.就是java里的断言函数,匹配请求里的任何信息,包括请求头等。根据请求头路由哪个服务
Filter: These are instances of Spring Framework GatewayFilter that have been constructed with a specific factory. Here, you can modify requests and responses before or after sending the downstream request.过滤器请求和响应都可以被修改。
客户端发请求给服务端。中间有网关。先交给映射器,如果能处理就交给handler处理,然后交给一系列filer,然后给指定的服务,再返回回来给客户端。
有很多断言。
spring:
cloud:
gateway:
routes:
- id: after_route
uri: https://example.org
predicates:
- Cookie=mycookie,mycookievalue
-代表数组,可以设置Cookie等内容。只有断言成功了,才路由到指定的地址。
spring:
cloud:
gateway:
routes:
- id: after_route
uri: https://example.org
predicates:
- name: Cookie
args:
name: mycookie
regexp: mycookievalue
创建微服务,使用initilizer,Group:com.atguigu.gulimall,Artifact: gulimall-gateway,package:com.atguigu.gulimall.gateway。 搜索gateway选中。
pom.xml里加上common依赖, 修改jdk版本,
在gateway服务中开启注册服务发现@EnableDiscoveryClient,配置nacos注册中心地址applicaion.properties。这样gateway也注册到了nacos中,其他服务就能找到nacos,网关也能通过nacos找到其他服务
spring.cloud.nacos.discovery.server-addr=127.0.0.1:8848
spring.application.name=gulimall-gateway
server.port=88
bootstrap.properties 填写nacos配置中心地址
spring.application.name=gulimall-gateway
spring.cloud.nacos.config.server-addr=127.0.0.1:8848
spring.cloud.nacos.config.namespace=bfa85f10-1a9a-460c-a7dc-efa961b45cc1
本项目在nacos中的服务名
spring:
application:
name: gulimall-gateway
再去nacos里创建命名空间gateway(项目与项目用命名空间隔离),然后在命名空间里创建文件guilmall-gateway.yml
在项目里创建application.yml,根据条件转发到uri等
spring:
cloud:
gateway:
routes:
- id: test_route
uri: https://www.baidu.com
predicates:
- Query=url,baidu
- id: qq_route
uri: https://www.qq.com
predicates:
- Query=url,qq
- id: product_route
uri: lb://gulimall-product
predicates:
- Path=/api/product/**
filters:
- RewritePath=/api/(?<segment>.*),/$\{segment}
- id: third_party_route
uri: lb://gulimall-third-party
predicates:
- Path=/api/thirdparty/**
filters:
- RewritePath=/api/thirdparty/(?<segment>.*),/$\{segment}
- id: member_route
uri: lb://gulimall-member
predicates:
- Path=/api/member/**
filters:
- RewritePath=/api/(?<segment>.*),/$\{segment}
- id: ware_route
uri: lb://gulimall-ware
predicates:
- Path=/api/ware/**
filters:
- RewritePath=/api/(?<segment>.*),/$\{segment}
- id: admin_route
uri: lb://renren-fast
predicates:
- Path=/api/**
filters: # 这段过滤器和验证码有关,api内容缓存了/renren-fast,还得注意/renren-fast也注册到nacos中
- RewritePath=/api/(?<segment>.*),/renren-fast/$\{segment}
## 前端项目,/api前缀。开来到网关后断言先匹配到,过滤器修改url,比如跳转到renren微服务,所以要注意renren后端项目也注册到 nacos里
## http://localhost:88/api/captcha.jpg http://localhost:8080/renren-fast/captcha.jpg
## http://localhost:88/api/product/category/list/tree http://localhost:10000/product/category/list/tree
测试 localhost:8080/hello?url=baidu
网关使用的是Netty
十三、前端vue-8001和element-ui
ES6+Vue写到了另一博文里
https://blog.csdn.net/hancoder/article/details/107007605
十四、三级分类
vue项目开放端口太麻烦了,其他主机访问不了。防火墙输入策略和host什么的修改过,nacos等其他服务能正常访问,vue项目别的主机访问不了,不知道哪里有限制
可以在config/index.js配置vue项目的ip和端口
此处三级分类最起码得启动renren-fast、nacos、gateway、product
element-ui的使用
https://element.eleme.cn/#/zh-CN/component/tree
提供了tree组件,他的数据是以data属性显示的。而他的子菜单是由data里的children属性决定的,当然这个属性可以改
defaultProps: {
children: "children",
label: "name"
}
pms_category表说明
代表商品的分类
这里有sql和entity不对应的情况,有的sql文件改起来比较麻烦,下面这个sql应该是准确的。不明白的看前面的数据库章节
CREATE DATABASE /*!32312 IF NOT EXISTS*/`gulimall_pms` /*!40100 DEFAULT CHARACTER SET utf8mb4 */;
USE `gulimall_pms`;
SET FOREIGN_KEY_CHES=0;
DROP TABLE IF EXISTS `pms_category`;
CREATE TABLE `pms_category` (
`cat_id` bigint(20) NOT NULL AUTO_INCREMENT COMMENT '分类id',
`name` char(50) CHARACTER SET utf8mb4 COLLATE utf8mb4_general_ci NULL DEFAULT NULL COMMENT '分类名称',
`parent_cid` bigint(20) NULL DEFAULT NULL COMMENT '父分类id',
`cat_level` int(11) NULL DEFAULT NULL COMMENT '层级',
`show_status` tinyint(4) NULL DEFAULT NULL COMMENT '是否显示[0-不显示,1显示]',
`sort` int(11) NULL DEFAULT NULL COMMENT '排序',
`icon` char(255) CHARACTER SET utf8mb4 COLLATE utf8mb4_general_ci NULL DEFAULT NULL COMMENT '图标地址',
`product_unit` char(50) CHARACTER SET utf8mb4 COLLATE utf8mb4_general_ci NULL DEFAULT NULL COMMENT '计量单位',
`product_count` int(11) NULL DEFAULT NULL COMMENT '商品数量',
PRIMARY KEY (`cat_id`) USING BTREE,
INDEX `parent_cid`(`parent_cid`) USING BTREE
) ENGINE = InnoDB AUTO_INCREMENT = 1437 CHARACTER SET = utf8mb4 COLLATE = utf8mb4_general_ci COMMENT = '商品三级分类' ROW_FORMAT = Dynamic;
cat_id:分类id,cat代表分类,bigint(20)
name:分类名称
parent_cid:在哪个父目录下
cat_level:分类层级
show_status:是否显示,用于逻辑删除
sort:同层级同父目录下显示顺序
ico图标,product_unit商品计量单位,
InnoDB表,自增大小1437,utf编码,动态行格式
sql注:
特立独行的猫那个sql文件里把表名大小写改了导致renren-fast启动不成功。如果启动不了的话,guli_admin数据库还是不要用他的了,还是接着用renren-fast项目下的db文件夹mysql.sql那个文件吧
http://localhost:8081/renren-fast/
{"msg":"invalid token","code":401}
1
验证码不显示问题
F12打开看了一下,验证码图片的端口还是8080,也就是说,你的renren-fast项目的端口更改了,而前端项目不知道你改过了。后面的笔记中有个【网关88】小节,去那里看吧
接着操作后台
localhost:8001 , 点击系统管理,菜单管理,新增
目录
商品系统
一级菜单
刷新,看到左侧多了商品系统,添加的这个菜单其实是添加到了guli-admin.sys_menu表里
(新增了memu_id=31 parent_id=0 name=商品系统 icon=editor )
继续新增:
菜单
分类维护
商品系统
product/category
…
menu
guli-admin.sys_menu表又多了一行,父id是刚才的商品系统id
菜单路由
在左侧点击【商品系统-分类维护】,希望在此展示3级分类。可以看到
url是http://localhost:8001/#/product-category
填写的菜单路由是product/category
对应的视图是src/view/modules/product/category.vue
再如sys-role具体的视图在renren-fast-vue/views/modules/sys/role.vue
所以要自定义我们的product/category视图的话,就是创建mudules/product/category.vue
输入vue快捷生成模板,然后去https://element.eleme.cn/#/zh-CN/component/tree
看如何使用多级目录
el-tree中的data是要展示的树形数据
props属性设置
@node-click单击函数
<el-tree :data="data" :props="defaultProps" @node-click="handleNodeClick"></el-tree>
<script>
export default {
data() {
return {
data: [{
label: '一级 1',
children: [{
label: '二级 1-1',
children: [{
label: '三级 1-1-1'
}]
}]
}, {
label: '一级 2',
children: [{
label: '二级 2-1',
children: [{
label: '三级 2-1-1'
}]
}, {
label: '二级 2-2',
children: [{
label: '三级 2-2-1'
}]
}]
}, {
label: '一级 3',
children: [{
label: '二级 3-1',
children: [{
label: '三级 3-1-1'
}]
}, {
label: '二级 3-2',
children: [{
label: '三级 3-2-1'
}]
}]
}],
defaultProps: {
children: 'children',
label: 'label'
}
};
},
methods: {
handleNodeClick(data) {
console.log(data);
}
}
};
</script>
网关88
在登录管理后台的时候,我们会发现,他要请求localhost:8080/renren-fast/product/category/list/tree这个url
但是报错404找不到,此处就解决登录页验证码不显示的问题。
他要给8080发请求读取数据,但是数据是在10000端口上,如果找到了这个请求改端口那改起来很麻烦。方法1是改vue项目里的全局配置,方法2是搭建个网关,让网关路由到10000(即将vue项目里的请求都给网关,网关经过url处理后,去nacos里找到管理后台的微服务,就可以找到对应的端口了,这样我们就无需管理端口,统一交给网关管理端口接口)
C+S+F全局搜索
在static/config/index.js里
window.SITE_CONFIG['baseUrl'] = 'http://localhost:88/api';
// 意思是说本vue项目中要请求的资源url都发给88/api,那么我们就让网关端口为88,然后匹配到/api请求即可,
// 网关可以通过过滤器处理url后指定给某个微服务
// renren-fast服务已经注册到了nacos中
接着让重新登录http://localhost:8001/#/login,验证码是请求88的,所以不显示。而验证码是来源于fast后台的
现在的验证码请求路径为,http://localhost:88/api/captcha.jpg?uuid=69c79f02-d15b-478a-8465-a07fd09001e6
原始的验证码请求路径:http://localhost:8001/renren-fast/captcha.jpg?uuid=69c79f02-d15b-478a-8465-a07fd09001e6
88是gateway的端口
# gateway微服务的配置
spring.cloud.nacos.discovery.server-addr=127.0.0.1:8848
spring.application.name=gulimall-gateway
server.port=88
问题:他要去nacos中查找api服务,但是nacos里有的是fast服务,就通过网关过滤器把api改成fast服务
所以让fast注册到服务注册中心,这样请求88网关转发到8080fast
让fast里加入注册中心的依赖,而common中有nac即可os依赖,所以引入common
<dependency>
<!-- 里面有nacos注册中心 -->
<groupId>com.atguigu.gulimall</groupId>
<artifactId>gulimall-common</artifactId>
<version>0.0.1-SNAPSHOT</version>
</dependency>
在renren-fast项目中添加
spring:
application:
name: renren-fast # 意思是把renren-fast项目也注册到nacos中(后面不再强调了),这样网关才能转发给
cloud:
nacos:
discovery:
server-addr: localhost:8848 # nacos
server:
port: 88 # 别和gateway冲突了
然后在fast启动类上加上注解@EnableDiscoveryClient,重启
如果报错gson依赖,就导入google的gson依赖
然后在nacos的服务列表里看到了renren-fast
在gateway中按格式加入
- id: admin_route
uri: lb://renren-fast # 路由给renren-fast
predicates: # 什么情况下路由给它
- Path=/api/** # 默认前端项目都带上api前缀,就是我们前面题的localhost:88/api
filters:
- RewritePath=/api/(?<segment>.*),/renren-fast/$\{segment} # 把/api/* 改变成 /renren-fast/*
# fast找
lb代表负载均衡,
网关-路径重写
上面已经直接写好了,这里只是说明一下,无需修改
修改过vue里的api后,此时验证码请求的是http://localhost:88/api/captcha.jpg?uuid=72b9da67-0130-4d1d-8dda-6bfe4b5f7935
也就是说,他请求网关,路由到了fast,然后取nacos里找fast。
找到后拼接成了http://renren-fast:8080/api/captcha.jpg
但是正确的是localhost:8080/renren-fast/captcha.jpg
所以要利用网关带的路径重写,参考https://docs.spring.io/spring-cloud-gateway/docs/current/reference/html/#the-rewritepath-gatewayfilter-factory
照猫画虎,在网关里写了如下,把api换成renren-fast(前面改过了)
- id: admin_route
uri: lb://renren-fast
predicates:
- Path=/api/**
filters:
- RewritePath=/api/(?<segment>.*),/renren-fast/$\{segment}
登录,还是报错:(出现了跨域的问题,就是说vue项目是8001端口,却要跳转到88端口,为了安全性,不可以)
:8001/#/login:1 Access to XMLHttpRequest at ‘http://localhost:88/api/sys/login’ from origin ‘http://localhost:8001’ has been blocked by CORS policy: Response to preflight request doesn’t pass access control check: No ‘Access-Control-Allow-Origin’ header is present on the requested resource.
从8001访问88,引发CORS跨域请求,浏览器会拒绝跨域请求。具体来说当前页面是8001端口,但是要跳转88端口,这是不可以的(post请求json可以)
跨域问题P47
问题描述:已拦截跨源请求:同源策略禁止8001端口页面读取位于 http://localhost:88/api/sys/login 的远程资源。(原因:CORS 头缺少 ‘Access-Control-Allow-Origin’)。
问题分析:这是一种跨域问题。访问的域名或端口和原来请求的域名端口一旦不同,请求就会被限制
跨域:指的是浏览器不能执行其他网站的脚本。它是由浏览器的同源策略造成的,是浏览器对js施加的安全限制。(ajax可以)
同源策略:是指协议,域名,端囗都要相同,其中有一个不同都会产生跨域;
URL 说明 是否允许通信
http://www.a.com/a.js
http://www.a.com/b.js 同一域名下 允许
http://www.a.com/lab/a.js
http://www.a.com/script/b.js 同一域名下不同文件夹 允许
http://www.a.com:8000/a.js
http://www.a.com/b.js 同一域名,不同端口 不允许
http://www.a.com/a.js
https://www.a.com/b.js 同一域名,不同协议 不允许
http://www.a.com/a.js
http://70.32.92.74/b.js 域名和域名对应ip 不允许
http://www.a.com/a.js
http://script.a.com/b.js 主域相同,子域不同 不允许
http://www.a.com/a.js
http://a.com/b.js 同一域名,不同二级域名(同上) 不允许(cookie这种情况下也不允许访问)
http://www.cnblogs.com/a.js
http://www.a.com/b.js 不同域名 不允许
跨域流程:
这个跨域请求的实现是通过预检请求实现的,先发送一个OPSTIONS探路,收到响应允许跨域后再发送真实请求
什么意思呢?跨域是要请求的、新的端口那个服务器限制的,不是浏览器限制的。
跨域请求流程:
非简单请求(PUT、DELETE)等,需要先发送预检请求
-----1、预检请求、OPTIONS ------>
<----2、服务器响应允许跨域 ------
浏览器 | | 服务器
-----3、正式发送真实请求 -------->
<----4、响应数据 --------------
跨域的解决方案
方法1:设置nginx包含admin和gateway。都先请求nginx,这样端口就统一了
方法2:让服务器告诉预检请求能跨域
解决方案1:
解决方案二为在服务端2配置允许跨域
在响应头中添加:参考:https://blog.csdn.net/qq_38128179/article/details/84956552
Access-Control-Allow-Origin : 支持哪些来源的请求跨域
Access-Control-Allow-Method : 支持那些方法跨域
Access-Control-Allow-Credentials :跨域请求默认不包含cookie,设置为true可以包含cookie
Access-Control-Expose-Headers : 跨域请求暴露的字段
CORS请求时,XMLHttpRequest对象的getResponseHeader()方法只能拿到6个基本字段:
Cache-Control、Content-Language、Content-Type、Expires、Last-Modified、Pragma
如果想拿到其他字段,就必须在Access-Control-Expose-Headers里面指定。
Access-Control-Max-Age :表明该响应的有效时间为多少秒。在有效时间内,浏览器无须为同一请求再次发起预检请求。请注意,浏览器自身维护了一个最大有效时间,如果该首部字段的值超过了最大有效时间,将失效
解决方法:在网关中定义“GulimallCorsConfiguration”类,该类用来做过滤,允许所有的请求跨域。
package com.atguigu.gulimall.gateway.config;
@Configuration // gateway
public class GulimallCorsConfiguration {
@Bean // 添加过滤器
public CorsWebFilter corsWebFilter(){
// 基于url跨域,选择reactive包下的
UrlBasedCorsConfigurationSource source=new UrlBasedCorsConfigurationSource();
// 跨域配置信息
CorsConfiguration corsConfiguration = new CorsConfiguration();
// 允许跨域的头
corsConfiguration.addAllowedHeader("*");
// 允许跨域的请求方式
corsConfiguration.addAllowedMethod("*");
// 允许跨域的请求来源
corsConfiguration.addAllowedOrigin("*");
// 是否允许携带cookie跨域
corsConfiguration.setAllowCredentials(true);
// 任意url都要进行跨域配置
source.registerCorsConfiguration("/**",corsConfiguration);
return new CorsWebFilter(source);
}
}
再次访问:http://localhost:8001/#/login
http://localhost:8001/renren
已拦截跨源请求:同源策略禁止读取位于 http://localhost:88/api/sys/login 的远程资源。
(原因:不允许有多个 ‘Access-Control-Allow-Origin’ CORS 头)
renren-fast/captcha.jpg?uuid=69c79f02-d15b-478a-8465-a07fd09001e6
出现了多个请求,并且也存在多个跨源请求。
为了解决这个问题,需要修改renren-fast项目,注释掉“io.renren.config.CorsConfig”类。然后再次进行访问。
P48 product请求路径重写
之前解决了登录验证码的问题,/api/请求重写成了/renren-fast,但是vue项目中或者你自己写的数据库中有些是以/product为前缀的,它要请求product微服务,你要也让它请求renren-fast显然是不合适的。
解决办法是把请求在网关中以更小的范围先拦截一下,剩下的请求再交给renren-fast
在显示商品系统/分类信息的时候,出现了404异常,请求的http://localhost:88/api/product/category/list/tree不存在
这是因为网关上所做的路径映射不正确,映射后的路径为http://localhost:8001/renren-fast/product/category/list/tree
但是只有通过http://localhost:10000/product/category/list/tree路径才能够正常访问,所以会报404异常。
解决方法就是定义一个product路由规则,进行路径重写:
- id: product_route
uri: lb://gulimall-product # 注册中心的服务
predicates:
- Path=/api/product/**
filters:
- RewritePath=/api/(?<segment>/?.*),/$\{segment}
在product项目的application.yml
spring:
datasource:
username: root
password: root
url: jdbc:mysql://192.168.56.10:3306/guli_pms?useUnicode=true&characterEncoding=UTF-8&useSSL=false&serverTimezone=Asia/Shanghai
driver-class-name: com.mysql.cj.jdbc.Driver
cloud:
nacos:
discovery:
server-addr: localhost:8848
mybatis-plus:
mapper-locations: classpath:/mapper/**/*.xml
global-config:
db-config:
id-type: auto
logic-delete-value: 1
logic-not-delete-value: 0
server:
port: 10001
如果要使用nacos配置中心,可以这么做
在nacos中新建命名空间,用命名空间隔离项目,(可以在其中新建gulimall-product.yml)
在product项目中新建bootstrap.properties,
spring.application.name=gulimall-product
spring.cloud.nacos.config.server-addr=127.0.0.1:8848
spring.cloud.nacos.config.namespace=e6cd36a8-81a2-4df2-bfbc-f0524fa17664
spring.application.name=gulimall-product
spring.cloud.nacos.config.server-addr=127.0.0.1:8848
spring.cloud.nacos.config.namespace=e6cd36a8-81a2-4df2-bfbc-f0524fa17664
为了让product注册到主类上加上注解@EnableDiscoveryClient
访问 localhost:88/api/product/category/list/tree invalid token,非法令牌,后台管理系统中没有登录,所以没有带令牌
原因:先匹配的先路由,fast和product路由重叠,fast要求登录
修正:在路由规则的顺序上,将精确的路由规则放置到模糊的路由规则的前面,否则的话,精确的路由规则将不会被匹配到,类似于异常体系中try catch子句中异常的处理顺序。
http://localhost:88/api/product/category/list/tree 正常
访问http://localhost:8001/#/product-category ,正常
原因是:先访问网关88,网关路径重写后访问nacos8848,nacos找到服务
接着修改前端category.vue,这里改的是点击分类维护后的右侧显示
data解构,加上{},把data的地方改成menus
//方法集合
methods: {
getMenus() {
this.$http({ // http://localhost:10000/renren-fast/product/category/list/tree
url: this.$http.adornUrl("/product/category/list/tree"), // 体会一下我们要重写product项目里这个controller
method: "get"
})
.then(({ data }) => { // success 响应到数据后填充到绑定的标签中
this.menus = data.data; // 数组内容,把数据给menus,就是给了vue实例,最后绑定到视图上
}) //fail
.catch(() => {});
},
————————————————
此时有了3级结构,但是没有数据,在category.vue的模板中,数据是menus,而还有一个props。这是element-ui的规则,
<template>
<div>
<el-tree
:data="menus"
:props="defaultProps"
>
而在data中
defaultProps: {
children: "children",
label: "name"
}
本文暂时没有评论,来添加一个吧(●'◡'●)